What is Nano Model railroading?

Nano model railroading is model railroading at a scale of 1:1,000. How on earth is this possible? Quite frankly, at the moment I don't know how possible it is but the technology exists to do it. So I'm going to have a go.

Friday, November 11, 2011

First night nerves

This is it.
Tomorrow my nano trains get their first showing at the Granite City Train show in St. Cloud, Minnesota. I hope it doesn't let me down. It works perfectly at the moment.
Hopefully before the weekend is out I will share with you my experiences and reactions of the viewers

Monday, November 7, 2011

Latest test run

I've been busying myself in the run up to the Granite City Train show and just to prove it here's some video of the latest progress.

Monday, October 24, 2011

The Other Project.

"What other project?" I hear you ask?
Well ever since my wife saw the Teeny Trains Christmas train display, she has thought it would be a good idea to have ago and build one ourselves. It would make a great centrepiece for the dinner table on Christmas day. So we have been rootling through the Christmas displays at the major crafts stores Michaels and Jo-ann searching for small trees and decorations suitable for the project. We've got quite a few bits and pieces and will start to pull the whole project together very shortly. To top it off I found this nice Model Lionel Trainset in Hallmark today. I think it would make a suitable subject to circle around under the tree if I can easily replace the trucks under the train with the IDL motors magnet platforms.
We'll see what happens...

Sunday, October 9, 2011

Workshop report

Time to give a quick report on progress with the Nano trains. I was in the "workshop" yesterday and I turned out another item of freight stock. A Coil car. I see many, many of these looking out of my window at work so it was a natural item to want to model. The curved covers make for a distinctive model even in 1:1,000 scale. I also added a first coat of paint to the SD. I decided it will be a SOO line loco. I think that will make it an SD40, I'm not sure that the SOO actually had any SD38's.
I'm painting it in the famous Red and White "hockey stick" livery. There are a couple of reasons for doing that. One is because it's one of my favorite loco colour schemes the other being that it is simple and distinctive. If I had taken the easy way out and painted it in a predominantly single colour livery UP yellow, DMIR maroon for example there would have been a chance it would look just like a colored blob running around the layout. This is something that I think I have to consider with all the items of rolling stock be it freight cars or locomotives. Stop them looking like tiny colored blobs, the viewers have to know they are looking at trains.
Of course, once they are painted I should then be able to take some better pictures of them.

Thursday, September 29, 2011

Bring your magnifying glass...

Look at that! Over 1300 hits on this little blog about little trains. Some people must be interested in this little project. So if you live in Minnesota and want to take a look at these little things come to the Granite City Train Show in Saint Cloud, MN . Bring your magnifying glass and take a look. See you there.
Now I'd better start on a display for the show...

Wednesday, September 28, 2011

Good News!

I am happy to report that the SD has been located!
It was found stuck to the underneath of one of my pairs of Hemostats on my modelling table. The model is so thin that the hemostat appeared to lie flat on the table, not looking like there was anything underneath them.
Another lesson learned. Even if it looks like there is nothing there. Check.

Monday, September 19, 2011

Oh Cr@p!

I just knew this would happen. I've lost the SD38...
Somewhere in my model railway room is a piece of white styrene about 25mm long x 3mm wide by about 4mm high. That's pretty easy to misplace. But ironically I haven't misplaced the even smaller boxcar models...
Perhaps thats a sign that I should build something smaller... Like a switcher perhaps.
Not to worry though I will build another SD38. It will be better than the first one.

Friday, September 9, 2011

The proof is in the seeing

Here we are then. Proof positive that 1:1,000 scale scratchbuilt model railroads are a viable proposition. The locomotive, mounted on a IDL Nano trains platform, cut to fit, does work. The loco has a bit of a "tankslapper" (yawing motion) on the back straight. I think because the magnets aren't aligned properly. But other than that this is a phenomenally promising test run. If I can do this then you can.
I hope you are as knocked out by this as I am.

p.s. after I posted this I removed and re-aligned the magnet platforms and the "tankslapper" was improved. Not cured, but much improved

An SD38

Here it is the first scratchbuilt 1:1,000 scale locomotive from the Nano workshops.
An EMD SD38.
"But wait a minute" I hear you say. "You said it was going to be an SD70, or a SD60 or something.Now I'm confused"
I don't blame you. It was to be an SD 70 or 60 or somesuch. But as I progressed and studied the drawings and realised the models at 1:1,000 scale. I came to see that an SD60 or 70 was just looking the same. I needed something a bit more distinctive. So I came across some drawings of an SD38. Granted at this scale this could be anything from an SD 38 to a 40. But its shape has more... More character. Construction wise its just a selection of styrene strips cut to size and glued together. There's still a bit of filing to do in the roof fans to level them off. But once again, you're seeing this several times actual size. So in reality it doesn't look so bad. Take a look and let me know if it will pass muster as an SD38.


The next task will be to mount these to some of the magnet platforms and see if the train runs.

A boxcar

Here we are then everyone. You will remember how I wrote before I went on holiday about the ease of constructing a boxcar. Well its time for some photographic proof...
Its about 14mm long 3mm wide and 4mm high and is meant to represent an excess height boxcar. Of course you won't know its an excess height car unless you see it against a regular height car...
Still these are very easy to make, the toughest part being the filing out of the grooves of some embossed styrene to make the distinctive ends.
It looks a bit crude but its the first car I made and you're looking at it several times actual size.
But wait there's more to come.

Thursday, September 8, 2011

This little world we model

My wife and I have just returned from three days in Yosemite national park. Truly one of the most awe inspiring places in the world (see picture below).
"All very well and good." I hear you say. "But what about some more Nano model railroading? Thats what I read this blog for. If I want holiday reports I'll watch the Travel Channel".
Not so fast.
Let's just look at this picture. Left of centre in the picture is the massive Granite monolith known as "El Capitan".
"El Cap" is over 3,000 feet tall. Which in 1:1,000 scale is over three feet tall. That's hip height on me. So, even in tiny, tiny modelling scales like 1:1,000 things that you model can still be big. Obviously El Capitan is an extreme. But I thought it would be refreshing to think in terms of larger features rather than concentrating on diesel locomotives that are under an inch long for once. Never been to Yosemite? Then think of your average supermarket or DIY superstore, large structures that would produce a 1:1,000 scale model of a reasonable size. (I tend to call models of this sort of structure a "slice of bread" model for reasons that would become obvious should you attempt such a model even in T scale)
Also, another holiday feature not entirely unrelated to model railroading was the flight, and no, I'm not talking about modelling an airport even though there are aircraft available in 1:1,000 scale. But as the aircraft was coming into land I was looking at the landscape trying to judge at what height everything below appeared 1:1,000 scale. You can learn a lot just looking. Taking in the differing textures of the ground below you. One thing I noticed is that scrubland can look a lot like Woodland Scenics ground foam.
So anyway, I'm back, refreshed and ready to have a go at some more Nano Model Railroading.

Thursday, September 1, 2011

Got a rival

I was digging around in the internet the other day looking for anything that could possibly be useful for this nano model railroading experiment and I came across this product. TY scale. 1:900 scale.
Ha! A paltry 1:900. That makes me feel really superior working in 1:1,000.
In all seriousness though. Having been working at this 1:1,000 for a couple of weeks now I have the greatest admiration for this chap who has been producing an entire range of sets in all kinds of wierd and wonderful sites for 10 years (I don't feel all that superior). Inside books and glasses cases for example. Even a miners lamp. I wonder if he'd give me any helpful hints and tips.
His trains run on a different system to the Nano trains. These trains are attached to a belt that moves instead of being on a track.
That's where I feel the nano train system is superior. Even in this tiny scale there is still the feeling of actually putting trains on a track. Which I think is an essential part of the model railroading experience. The hyper-miniature trainset models of David K Smith fall into another category altogether where this essential can't possibly apply.
However, what these tiny models do show is that:
1. A very attractive model can be realised even in these tiny scales.
2. I'm not the only one who can't photograph these tiny things close up...

Tuesday, August 30, 2011

More progress I can't photograph (boxcar part 2)

I have a grand total of 4 boxcars on the go now. They really are simplicity itself to put together. I cut these "bodies" to length from a section of styrene strip in a NWSL chopper, made the ends from the grooved sheet with the grooves filed out, cut them to size and glued them to the "bodies".
These simple techniques produced something that really was starting to look like a boxcar so I took the plunge and added doors.
Yes, doors.
Well when I say doors it's more of a piece of .25mm styrene cut into 3.5mm squares and placed where the door would be. But in 1:1,000 scale it looks like a door.
I'll try and post a picture before I head away to Yosemite for a long weekend over the labour day weekend.

Monday, August 29, 2011

It's all rather crazy really (box car part one)

You'll have to believe me on this one. Some of this stuff is really difficult to photograph, so if I say I've done this take my word for it for the moment, OK?
What would you think would be the easiest thing to build in 1:1,000 scale?
A boxcar perhaps?
Thats pretty much what I thought too. So it seemed a pretty good idea to have a go at building a few. Because if I'm going to build a nano freight train, I'm going to need a few. A little bit of research on the internet garnered me a set of drawings and dimensions for a Gunderson excess height car. Excess height cars. I like them. So a great project for a first boxcar model.
A boxcar then. Sections of 3.2 x 4mm styrene strip cut to length.
BUT. (there always has to be a "but" doesn't there) take a look at these railbox pictures notice how distinctive the end is this is typical of all modern boxcar ends. Strips of evergreen are plain ended, so how to re-create it? I remembered something I'd done in T scale with the worlds first T scale freight car the ribbing on the sides was created by finding a sheet of styrene of whatever pattern cut to gondola height size and length and topped off with a thin strip of styrene. It might not be "to scale" but it looks the part. So a similar idea was in order for the ends of the boxcar. I found the narrowest V groove sheeting I had and then widened out the grooves to give the right sort of effect. (You will now understand why photography of this is difficult...)
Surprisingly this was not a difficult task and enough sheet for several boxcars was created in a matter of minutes. As I write this the ends are glued to sides ready to be trimmed when the glue has set firmly. I'm quietly confident that my 1:1,000 scale boxcars will look quite good when finished.

Friday, August 26, 2011

What am I playing at?

I really think that I'll add that as a label for my posts because every time I do something in 1:1,000 scale I have to take a step back.
I started on a caboose last night.
12mm long over the couplers, 9mm long body, 5mm to the top of the cupola, 3mm wide...
What am I playing at?

Tuesday, August 23, 2011

Now we get serious (locomotive part 3)

Right, I can't keep putting this off. at some time I have to put a blade to styrene and work on something to test out construction theories.
I have a large supply of styrene sections on hand from previous projects and just happened to have some suitably sized sections in stock. So I set to and cut them to size, glued them together and then shaved them to shape with a razor blade.
That's it. Nothing clever, and yes I did wear a binocular magnifier to do the job. This is a very crude "proof of concept" model. But I believe it shows that this method for locomotive construction in 1;1,000 scale is sound. The secret will be to take it slowly and slice off a little at a time. Sometimes "taking it slowly" is something I fail to do. Anyway, it certainly bolsters my confidence. Especially when I think about the difference between my first and third trees at the weekend. What could loco number three look like?
Photographing it was actually quite difficult to get the white styrene to show the shape I'd carved it to without bleaching it out and loosing all the detail..

A "what am I playing at?" moment

Last night I has another of "those" moments. A moment when it really sets in as to what I'm letting myself in for. So if you'll bear with me I'll explain.
Last night I printed off the drawing of the SD60M at 1;1,000 scale.
Its small.
Smaller than I envisioned. Place two wooden coffee stirrer sticks side by side. That's how wide the engine compartment hood is. Under 3/4" (about 15mm) long and a scant 3.5mm tall.
That's small. I was in a sort of shock.
Strangely though I was comforted to see that the lettering on the side of the hood was quite legible and there was a surprising amount of detail to be seen on the tiny drawing. Much more than I expected.
Then I began to realise that it wasn't all that bad. The calmer more rational side of my mind started to take over and actually start to work out how to create this tiny model.
Lets just say I have some good ideas and I'm raring to go to put them into practice.

Monday, August 22, 2011

The locomotive project (part 2)

Nothing is ever as easy as it seems. Sometimes it's the easiest parts of a project that cause the most problem. Case in point with the SD70MAC project. You'd think with all the information out on the internet I would be able to find a comprehensive set of dimensions out there to enable me to get the model right. Well if you thought that then you're wrong. I haven't found any yet.
What I have found however is a nice set of drawings of an SD60M. I like SD60M's also known as Tri-clops because of the three front cab windows... Not that you're going to be able to make out the three front cab windows on a 1:1,000 scale model when its moving.
So SD70MAC or SD60M? Who knows...

Saturday, August 20, 2011

Nano tree number three

Another tree for the afternoon. This one inspired by this 60+ footer seen from my back yard. The real thing is a bit spindlier and thinner than my version. Crowded around by other trees its difficult to make out the exact shape.
But I still feel that this is quite a convincing portrayal of a tree.
After just three attempts I feel that this technique is very viable for making trees in this super small scale. I can only get better at it. Time wise they don't take all that long to make. I spent more time waiting for caulk, glue and paint to dry than I did making up the armature.
Though I wouldn't consider making every tree for any layout by this method they will certainly make a talking point placed in a prominent position on the layout.

Nano tree No. 2

Right then, as promised here in tree No. 2 for your perusal. Already you can see it's a BIG improvement over the first one. These things are so incredibly fragile the mere act of breathing near them can cause a small bit of foliage to move and destroy the effect. I think I got away with it on this picture, you can make out some bits of bough among the foliage. Bear in mind too that this picture is about three times larger than actual size. So perhaps I'm being too hard on myself. I do though wonder of 30 odd feet is the smallest practical size to model a tree in 1:1,000 scale. I've actually just photographed a 60 foot tree of some type and will see if the increased size makes it easier to model.
So to the Woodland Scenics fine leaf foliage product. Very impressive stuff, even looking at this small piece photographed below you can see that there is the makings of an Oak tree or something similar.
And you thought model scenery in 1:1,000 scale was going to be hard...

My first nano-tree

In keeping with the "warts and all" approach to this blog detailed here is my first attempt at a tree in 1:1,000 scale.
You can't beat having realistic looking trees in your model landscape. Everyone should have them.
While I agree that mass produced model trees are getting more and more realistic (if a bit expensive). There are still people out there using the cheapo bottle brush efforts which saddens me as really nice trees are quite easy to do and they are probably easier to do in the smaller scales like N and Z and T than they are in say O. But this same construction theory holds out in all scales.
Above: The first, and most important thing is to find yourself a tree. This one is the approximately 35 foot tall paper birch in my front yard. Take a picture, print it off and study it.
Next: Find yourself some old multi strand electrical wire. Cut some of the sheathing off exposing the strands (1) and then start to separate them and bend them to the shape of the trunk and branches of the tree (2)
Then: I paint the wire armature with painters latex caulking and then, when that has dried I paint it with colours that suit the bark of the tree. Finally adding foliage in the form of Woodland scenics fine leaf foliage. Which, in this tree, is actually quite disappointing as it has smothered all the branch detail underneath.
A second attempt is called for which I will do right now...
When I get that second one done I will also post a picture of plain woodland scenics fine foliage which also makes very acceptable trees when shaped.

The amazing Nano video show

IDL motors have their own Youtube channel where product demo films are posted. I thought I'd share some of them with you in case you had missed them.
This first one shows what appear to be HO scale people on bikes, cattle and pedestrians all moving on a teeny trains track .
This second one is very, very interesting it shows some Hallmark Christmas tree decoration Trains "motorised" by adding magnets underneath them.
This is as small as it gets. The track size is 85mm x 55mm (3 1/2" x 2" approx) the moving cars are 5mm long.
All amazing stuff.
Ed tells me that in the three and a half years of product development they have moved objects varying is size from 5mm to 60mm in length.
I can see all kinds of opportunities for this technology in your model railroads. In O scale or G scale you could model the inside of a factory or warehouse and feature working conveyor belts moving products around the model.
I'm sure someone (maybe my wife and I) will try motorising the Hallmark decorations to make a unique Christmas Dinner table centrepiece.
The only thing stopping you is your lack of imagination.*
I'm really fired up right now. I'm going to have to go and so some Nano model making.

*"The only thing stopping you is your lack of imagination." I like that. Don't be surprised if that tagline doesn't appear on this blogs title block soon...

New Product News!

Since buying my Nano train kit of parts I've been corresponding with Ed Lopatinsky the CEO of IDL motors, the producers of these "teeny trains" and yesterday he shared with me these pictures (which he has kindly allowed me to share with you) of their latest product they are labeling "TeenyTrack".
This TeenyTrack set is a bit smaller (120mm x 80mm) than the currently available oval of track in the Nano train parts sets that I have. The big difference is that with this new teenytrack the controller electronics are integrated into the baseboard, so that there is no plugging in of wires from the controller to the track. A task that I actually struggled with for a few minutes when I assembled mine. Ed also tells me that the controller can be pre-programmed in their lab to accommodate any kind of motion, completely random, faster-slower, or stop start etc; The price for this piece of miniaturization? About $50
One last point Ed made sure that I stressed is that this product is "Proudly made in the USA"
Edit: Sunday Aug 21st post updated to show the latest versions of the "TeenyTrack" board

Friday, August 19, 2011

A new record?

To be honest I was just a bit surprised yesterday when the page views count for this blog went over 200 in the two days since the blog went live. My blogs don't pick up viewers that fast. I guess that there must be something about really small model railroads that fascinates people. Or perhaps people want to see me fall flat on my face with this adventure.
Thank you for checking in.
So anyway much serious thinking is always going on as I work out the best way to go about working in such a small scale. I've even downloaded Google Sketchup to see if producing locos and rolling stock by 3D printing will be viable in this small size.
The weight of the items is the over riding concern. The items of rolling only have tiny magnets inside them to "power" them, per the linear induction motor system used to make the small trains move. It,s a question of what weight will these magnets bear against the magnetic field of the track and keep moving. Even Ed Lopatinksi, the developer of the system, wonders about this. So I might end up making items of rolling stock in several different materials to find one that works. I have several different materials in line:
1. Thoughts started with matte photo paper or a high quality thin card. This would have the advantage of being able to have a loco livery printed on the paper before folding up to the right shape. The problem being that some folds on the paper might be rather small and awkward to achieve.
2. Architectural foam (Balsa foam or similar). The loco/stock would be carved out of a piece of foam, sealing and painting the foam might add too much weight to the item though.
3. Good old styrene.The thinnest strip possible to save weight made just as you would a larger item of stock but everytime you glue or paint or fill you'd add weight.
Perhaps I'm worrying needlessly about the weight, we'll have to see.
Buildings will be no trouble (famous last words) but if I've made T scale petrol/gas pumps complete with hoses I think I can make buildings and bridges and such like without too much of a problem.
I'm looking forward to having a go at some trees. They were the first thing I did in T scale and I may well find the time to have a go at some nano trees this weekend.

Wednesday, August 17, 2011

The locomotive project (part 1)

Well, if I'm really serious about this scratchbuilding in 1:1,000 scale malarkey I'd better nail my colours to the mast and come up with a project.
To be honest it wasn't all that difficult.
Here it is, the SD70MAC.

The one thing that drew me to this class of loco is the shape. It's nothing but squares. Square engine compartment hood, Square cab, pretty squareish nose. For a first time project in a ridiculously small scale it couldn't get much simpler.
At 74' long the SD70MAC scales out to 22.5mm long in 1:1,000 scale which is a bit shorter than the 25mm of the body of the Nano train chassis. (The chassis also extends to 29mm long over the necessary buffers.)
BUT (and here's the joy of striking out on your own in a new direction with new materials at your disposal.)
If I was to model the loco at 1:900 scale it then works out to be 25mm long! That is such an incredible co-incidence I don't think it should be passed over lightly.
1:900 scale would make things a tiny bit bigger, perhaps easier to work with. It would also be half the size of T scale, to give people a frame of reference.
But then I'd loose the 1:1,000 novelty.
Whatever I do its still going to be blooming small.
Perhaps I'll test my skills out in both sizes.
Now to work out how to actually make the thing.

Tuesday, August 16, 2011

The Excitement of the new

I've spent a very pleasant night tonight Googling 1:1,000 modelling. I must say it's been very exciting and enlightening. I've added quite a few useful and inspirational links over there on the right.
As you probably know 1:1,000 is an architectural model making scale. Huge grand buildings fit in the palm of your hand. Architectural modelling has its own styles and construction methods which I'm still researching and looking forward to incorporating in a model. The discovery of Balsa foam opens up some interesting ideas for my structure modelling. I'll be trying to get hold of some in the near future.
The links to some of the models is overloading my brain with ideas for a layout right now. I think I need to go and lay down in a darkened room to let it all sink in.
G'night all...

What I'm up against.

Here we are then, some close up photos of the nano train stock as bought. Complete with a US penny in the background. It's blurred because everything kept shaking as cars went past on the road during the 25 second, f18 exposure. I got fed up of re-taking the shot, due to the vibration. this is the best one... You get the idea.
Lets for sake of argument call this the Coors light train, because that is kind of what I'm put in mind of looking at it. It comes as a loco and 3 passenger cars all based around the same 29mm long plastic chassis. The silver plastic bodies are 25mm long as near as makes no difference and are just a simple push fit on the body. Inside the chassis are 4 tiny magnets, two about 1mm in diameter and the other two about 2mm. I'll delve into the interior workings (!) later in another post, when the roads aren't so busy and I can produce shake free photo for you. These are tiny things. Just how tiny you can judge from the picture below.
Above: Left to right - Z scale boxcar, T scale KiHa 40 railcar, Nano train.
This size is both scary and inspiring. Scary because of the tiny size but it inspires me so much my brain is flowing with ideas on how to build new bodies for these things. But I'll start a whole new post for that soon. For now just take in the size. If you want to buy one go ahead. Here's the link to the site.

Click on these links.

To see the basic Nano train kit of parts running

Tell me you aren't just a teeny bit amazed...

You DO have room for another model railroad!

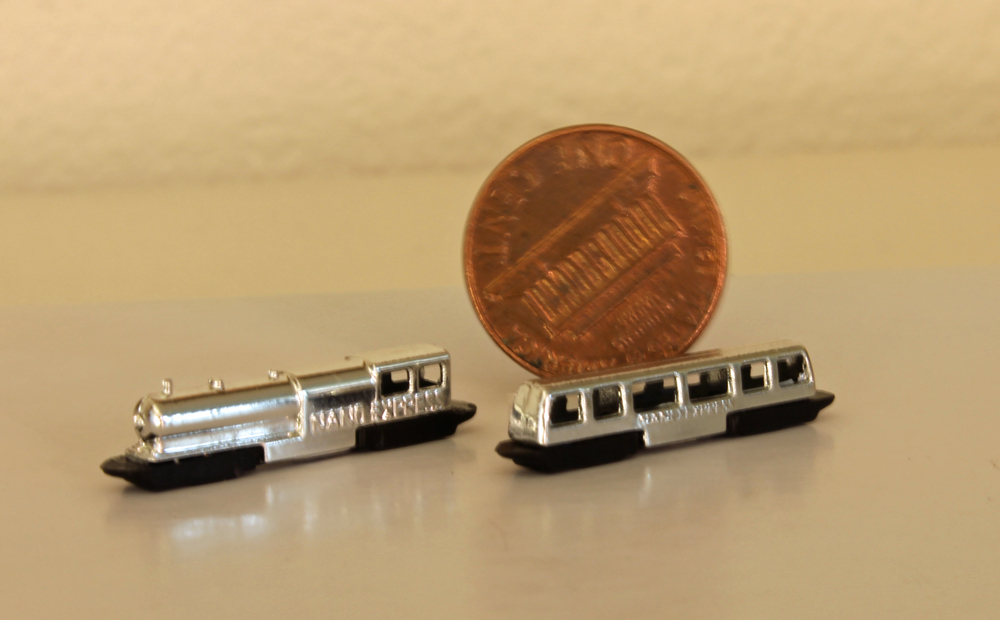
Three and a half years in the making. These "Teeny Trains" are the latest thing in small model railways. An oval of track supplied in the train set is about 6" x 5".
While undoubtedly toy like at the moment, to see one of these tiny sets run is nothing but amazing.
Why would I try and devote some time with model railroading with such a toy? Well T scale was seen as a toy a few short years ago. Yet now, many successful entertaining layouts have been built and exhibited at train shows amazing the viewing public. I've had a whale of a time with T.
Using RP (rapid prototyping) technology small manufacturers have built up lines of products covering US, UK, Australian, and Finnish prototypes. A variety of stock that rivals Z scale.
So why could this not happen with these "Teeny Trains" or "Nano Model Railroading" as I like to call it?
The mechanics of the how the train works can be discussed at a later date. But for the moment there are two projects that I/we are working on. I say we because my wife took one look at the pictures of the "Christmas train" sets on the Teeny Trains website and said.
"We could do that." So we intend to make our own personalised "train under the Christmas tree" set. While I also have plans to create some modern US outline locos and stock and build some kind of layout for them.
Like some kind of persistant child. I can still hear folks asking "Why"
It's all a question of testing oneself, developing new skills. Working in T scale was probably the most rewarding thing I did. I built a working lighthouse, a T scale petrol (gas) station, and very probably the worlds first items of US outline rolling stock. Things I would never have considered having the skill set to do. But I did them and quite well too. So who's to say I can't do the same with these Nano trains and develop a whole new skill set that might serve we well in other model making fields.
I've no idea how to approach these problems but I'm going to have a go.
So follow this blog and see what happens.